|
Алгоритм создания
1.Open the scene file named Keyframing.mb.
This file can be found in the GettingStartedLessonData directory that was installed with
your Maya software, or from the drive where you copied the Getting Started
Files.
GettingStartedLessonData/Anim/Keyframing.mb
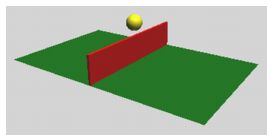
The scene contains a ball object that is currently
positioned on the X-axis near the edge of a ground plane.
To set the playback range for the scene
To animate the ball, you key its position at different times
of the playback range.
The playback range is defined by the Time and Range slider.
The Time and Range slider controls allow you to playback or scroll through your
animation or move to a specific point in time of your animation so you can set
keyframes.
- Look over the playback controls, as shown in the figure
below:

Time Slider
displays the playback range and keys you’ve
set for a selected object. Keys are displayed as red lines. The box at the right
of the Time Slider lets you set the current frame (time) of the animation.
- Playback Controls
control animation playback. You may
recognize the conventional buttons for play and rewind (return to the start
time). The stop button appears only when the animation is playing. To find out
which operation a button represents, hold the mouse pointer over it.
- Animation Preferences button
displays a window for
setting animation preference settings such as the playback speed.
- Range Slider
controls the range of frames that play when
you click the play button.
- The above items will have more relevance as you work through
this lesson. After you complete this lesson, experiment with these items to
learn more what they do.
2.The playback range is currently set at a range of 1 to 24.
At a default playback rate of 24 frames per second, the scene can play for one
second. Because you’ll animate the ball for a few more seconds than this, you
need to lengthen the playback range.
//*****************************************
In the Playback End Time box (see above), enter 72.
A frame rate of 24 frames per second (fps) is the frame rate
used for motion picture film. For video, the frame rate can be 30 fps (NTSC) or
25 fps (PAL) depending on the format being used.
With a playback range of 1 to 72, you’ll be able to create
three seconds of animation. (72 frames divided by 24 frames per second = 3
seconds.) This is enough time for the short animation you’ll create in this
lesson.
Setting
keyframes
In the following steps, you use keyframes to set the starting and
ending positions of the ball’s movement.
To set beginning and ending keyframes
- Click the rewind button to go to the start of the
playback range.
This changes the current frame to 1.
- Select the ball, then select Animate > Set Key.
(Keyboard shortcut: s).
This sets a key at frame 1 for all transform attributes of the ball. Transform attributes are
the X, Y, Z move attributes. Although you animate only the translate X and Y
attributes of the ball in this lesson, keying all transform attributes saves you
time having to choose specific attributes to be keyed.
In the Time Slider, notice the red marker at frame 1, known as a tick. This tick
appeared when you set the key for frame 1. With the ball selected, ticks in the
Time Slider indicate where you’ve set keys.
- Go to frame 72.
A convenient way to do this is to click
the desired position in the Time Slider.
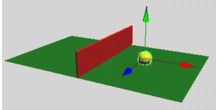
- With the Move Tool, drag the ball’s X-axis handle to
position the ball at the right edge of the ground as shown in the image
below.

- Set a key at frame 72. (Press s.)
- Go to the start time and play the
animation.
From the two keys you’ve set, Maya creates motion between
the positions. By default, the animation plays in a loop from frame 1 to 72. The
ball travels through the fence at this stage.
- Press the Stop button on the playback control to stop the
animation after you view a few repetitions.
You can drag the mouse back and forth (scrub) in the Time
Slider to see the animation play back and forth at the speed you drag the mouse.
If you were to display the scene with
Panels > Layouts > Four Panes, only the active panel would show the ball
moving.
To make the ball fly over the fence rather than pass through it,
you need to position the ball above the fence and set a key there.
To set intermediate keyframes
- Go to frame 33 or so—at the moment where the ball sits in
the middle of the fence.
- With the Move tool, drag the Y-axis handle of the ball
until it sits slightly above the fence.
Tip
Throughout this lesson, tumble the perspective view or examine
a front view to make sure the positioning is correct.

- Set a key. (Press s.)
- Play the animation.
The ball now flies off the ground, over the fence, and back
to the ground in a smooth arc between the keyed start, middle, and end
positions.
- Press the stop button to end the playback.
In subsequent steps, play the animation after each key you
set. It’s generally useful to check your work in progress after each key,
especially when you are learning.
In the next steps, you’ll set keys to bounce the ball in the
middle of the right half of the ground.
To set keyframes to make the ball bounce
- Go to frame 50. At this moment, the ball sits in a
position above the middle section of the right half of the ground.
- Move the ball so it sits on the ground.

- Set a key.
- Go to frame 60.
- Move the ball up again, but not as high as its peak
height above the fence.

- Set a key. When you play the animation, the ball travels
over the fence and bounces on the other side.
If you have a fast computer, you might notice that the
animation plays too fast. By default, Maya plays the animation as fast as it can
be processed. Because this scene is simple, the animation might play faster than
the default film rate (24 frames per second).
Do not be concerned that the animation plays with a halting
or jerky motion. When you render all the frames of your animation for final
production, the animation will be smooth. If you want to preview the animation
at the smooth production speed (or nearly so), use Window > Playblast.
|
